
Learning Center · Magnification
When Magnification Helps With Card Inspection—and When It Misleads
As an Amazon Associate I earn from qualifying purchases. This guide includes optional paid Amazon links; purchases through them may earn a commission. Product links do not affect inspection guidance.
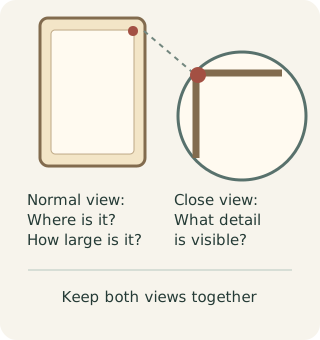
Magnification helps when it lets you locate a small finding and check its shape or exact position. It misleads when a close-up becomes the only view: ordinary print texture can look dramatic, digital sharpening can create false edges, and a tiny mark can lose its scale. Start at normal viewing distance, enlarge only a specific question, then return to the full-card view before deciding what the observation means.
Choose a question before choosing a lens
Useful questions include: Is that white point attached to the corner or only to the background? Does the edge show a local chip or broad roughness? Is the fine line on the card surface, or does it align with a sleeve reflection? A loupe, desk magnifier, phone macro mode, or close crop may help you inspect those details. None is required for a sound basic inspection. If the front and back at ordinary scale already show an obvious crease, more enlargement may add little to the decision.
If a loupe would help answer a specific question, view an example handheld loupe on Amazon (paid link). Keep the lens off the card.
Keep the card supported on a clean surface and inspect without pressing a device, ruler, or lens onto it. For an in-hand view, move the light or viewing angle slowly while maintaining the card's position. If a protective holder creates reflections, recognize that magnification enlarges its marks too. Do not remove a card repeatedly from protection merely to improve a close view, and never open a graded slab for this purpose. The layer guide gives safer optical clues when plastic is involved.
Understand what each kind of enlargement changes
An optical loupe or desk magnifier enlarges what your eye sees, but a narrow field of view can make it hard to remember the location. A phone macro mode or attachment can record detail, yet close focus often leaves only a thin slice sharp. A digital crop enlarges pixels that were already captured; it cannot recover detail that the original image missed. Digital zoom may also apply processing, and sharpening can draw bright outlines around high-contrast card edges. Keep the uncropped photo for context and compare any processed version with it.
Try the least complex method that resolves your question. A phone photograph made from a stable position in good ordinary light may outperform a shaky extreme close-up. If the camera hunts for focus, back away, tap the suspect area on the screen, and take a full-resolution image to crop later. Do not claim that a blurred pixel cluster is a confirmed edge defect. A bigger image is useful only if it contains trustworthy detail.
Light matters more at close range
At higher magnification, a small change of angle can move a reflection across the entire frame. Take an even-light context image first, then move an ordinary lamp or the camera angle a little at a time. Keep a printed landmark visible so you can recognize the same physical spot. A narrow line that appears only when the reflection crosses it may be worth further inspection, but one lighting setup cannot identify its origin. The reflective-surface guide gives a repeatable moving-light sequence for foil and gloss.
Depth of field matters too: the edge might be sharp while nearby artwork is soft, or the holder surface might be sharp while the card underneath is not. That focus difference can be a clue, but phone autofocus and small layer separations can make it unreliable. Take another view instead of treating one focus result as proof. Overexposed highlights hide detail even when the image looks bright and crisp. Lower exposure or change the lamp position until the printing around the mark remains visible.
Return from close-up to context
At high enlargement, normal cardstock texture, print dots, foil patterns, and tiny edge irregularities can fill the frame. That does not automatically make them severe damage or a grading problem. Look again at the full side at ordinary scale. Ask whether the feature is visible there, whether it changes the card's appearance for your purpose, and whether the close-up represents the same location accurately. Keep observations distinct from guesses about manufacturing cause or professional grade effect.
A compact documentation set has a full front or back, a context photo with a nearby landmark, and one focused close-up. Add an angled-light view only if it reveals something new. The defect-photo guide explains how to label those views for another person. A magnified image without orientation, original scale, or lighting context may be persuasive-looking but difficult to interpret. Give the reviewer both the small finding and the card it belongs to.
Know when to stop enlarging
Stop when another level of zoom adds blur, processing artifacts, or an uncertain pattern rather than new detail. Stop when the question is already answered at normal scale. Stop if getting a better view would require rubbing, flexing, or risking a card's holder. If two sensible views conflict, record the finding as unresolved and seek a different angle or in-hand inspection when safe. Uncertainty is more useful than a confident conclusion built from pixels the camera never captured.
Magnification is a supporting tool within the wider condition workflow. It can help locate a mark and communicate it, but it does not replace the full front and back, moving light where appropriate, and a clear note about which areas were actually assessed. Choose equipment by whether it helps you answer a real question, not by a claimed required magnification level.