
Learning Center · Reflective surfaces
How to Inspect Holofoil and Glossy Trading Cards Under Light
As an Amazon Associate I earn from qualifying purchases. This guide includes optional paid Amazon links; purchases through them may earn a commission. Product links do not affect inspection guidance.
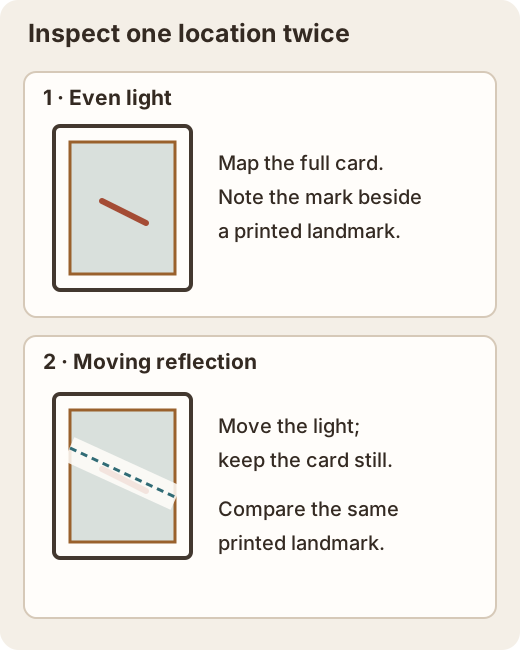
Use two views for two different questions: a square, evenly lit full-card photo maps the card and can support centering; an angled, moving reflection tests its reflective surface. Keep the card supported and change one variable at a time so you can compare the same printed location across views. A scratch or impression may become visible under the moving reflection, while glare can also create a convincing false line.
Make a neutral first view
Start on a clean, stable surface with enough diffuse light to see the whole front. Keep the camera nearly square to the card and avoid an overexposed reflection that hides the foil detail. Take a full-card image with all corners and edges included, then do the same for the back. This establishes orientation and lets you map any later finding to a fixed card location. If you need setup details for focus, background, or framing, use the card photography guide.
An ordinary room lamp or indirect window light can provide the first view; no specialized light is required. Avoid direct sun and an overexposed flash spot. The goal of this first image is to locate the card and any suspicious area, not to prove the surface is free of fine marks. If the light creates a large white patch, change its position or lower the camera exposure until the printed detail returns.
Move a reflection across the surface
Keep the supported card and camera still at first. Move an ordinary lamp slowly until its reflection crosses the suspected location, then repeat from another direction. If the lamp cannot move, change your viewing angle slightly while keeping track of the card’s top edge. A low-angle pass can make a scratch, scuff, or dent interrupt the reflected shape. Change only one thing between photographs so you can tell whether the mark stayed at the same card landmark.
If a movable desk light would help your setup, view an example adjustable desk light on Amazon (paid link).
Watch one region at a time: upper foil, center art, lower text box, then borders. On patterned foil, compare a suspected line with nearby repeated texture. A pattern transition can resemble a scratch in one frame. Pause with the reflection just before, on, and just after the location, and save those three views. A single setup will not reveal every type of surface issue.
Tell glare from a mark attached to the card
A glare patch changes position or shape as the light angle changes. A physical mark remains in the same place relative to the card artwork, although its visibility may brighten, darken, or vanish at certain angles. Mark the suspected position mentally, then compare it against a printed landmark in each view. If the bright line travels across several landmarks, it is likely a reflection. If the same tiny interruption reappears beside one letter or image detail, capture a second photograph.
This test has limits. Scratches on a sleeve, toploader, or slab can also stay near the same apparent card area. Dust can cast a fixed-looking shadow through plastic. Use the card-versus-holder troubleshooting guide when protective layers are present; a single photograph cannot always localize the layer.
What common surface findings look like
A scratch may appear as a narrow bright or dark track when the reflection crosses it. A scuff can cover a broader dull patch. A dent or impression may bend the reflected shape or create a small crescent shadow without obvious color loss. A print or roller line may run steadily through foil or print; its visible path alone does not prove origin or tell you how a grader will treat it. Fingerprints and residue can create cloudy or curved areas, but avoid touching or rubbing the card just to confirm the substance.
Inspect the reverse with the same care. A non-foil back can still show scuffs, gloss loss, dents, or pressure marks. Compare front and back at the same physical location when you suspect an indentation or crease. If one side lacks a usable view, say so. The defect-versus-damage guide helps describe the finding without making an unsupported cause claim.
Control camera artifacts
Overexposed highlights erase texture. Reduce exposure or move the light until detail returns, then take a second frame. Excessive sharpening can invent high-contrast halos; denoising and compression can smooth away faint lines. Save an ordinary full-card view and at least one angled view rather than only a dramatic close-up. If a close-up looks suspicious, confirm the same location at normal scale so processing artifacts do not become your only evidence.
A sleeve or holder adds another glossy plane. If safely accessible, a card may be easier to assess outside an outer holder, but do not repeatedly remove a card or risk a corner just to improve a photo. Never crack a slab for this purpose. When safe access is unavailable, label the relevant area “obscured by plastic” or “surface not resolved.” No amount of zoom restores information blocked by reflection.
Document a useful photo sequence
- Take an evenly lit, square full front and full back; keep those as location references.
- With the card supported, place the reflection just before the suspected area and photograph it.
- Move the light across the same printed landmark and photograph the reflection on and just beyond it.
- Repeat from another direction if the finding remains ambiguous.
- Add a close-up after preserving the full-card reference, then note side, landmark, light behavior, and any holder limitation.
For a full decision about corners, edges, and all surfaces, return to the condition-inspection workflow. This light pass answers a narrower question: whether the reflective surface provides usable evidence. A clean-looking sequence improves confidence, but it does not establish a professional grade or rule out every defect.