
Learning Center · Centering limits
Borderless and Asymmetric Cards: When Centering Ratios Don't Work
The Centering tool compares a card's physical edges with a repeatable printed inner boundary. On a regular, symmetric frame, opposite visible border widths can be a useful proxy for print-to-cut balance. A borderless or intentionally asymmetric design may offer no defensible inner boundary on one or both axes. The tool can still produce a number if guides are forced onto artwork, but the number would describe those choices rather than manufacturer-intended centering.
Know what the measurement actually represents
The first-party measurement method places outer guides on the visible physical card edges and inner guides on the printed boundary between frame and central design. It calculates left and right border widths from those paired coordinates, and top and bottom widths the same way. Opposite widths are normalized into ratios. This is a visible-image measurement, not automatic card recognition or access to hidden print-sheet geometry.
The method works best when the design offers straight, consistent boundaries that appear intended to be symmetric around the card. Before dragging guides, ask whether another careful collector would choose the same four boundaries without seeing your desired result. If there are several plausible art lines, the most flattering one is not a neutral reference. A numerical output cannot repair an ambiguous definition of “border.”
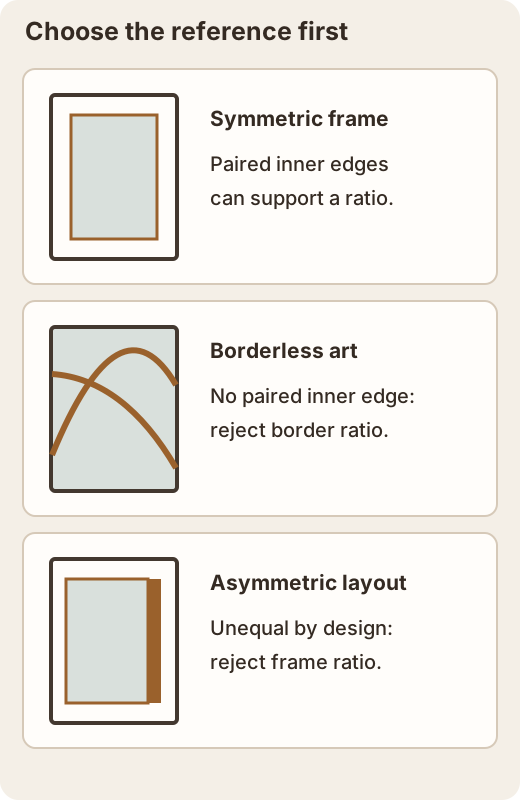
Three common designs, three different decisions
Borderless artwork: printed art reaches the physical edge, so there is no continuous border to measure. A character, horizon, text box, or color break might look centered, but it may not be the intended geometric anchor. You can describe visible cropping or asymmetry qualitatively; do not report a border ratio unless a genuine repeatable printed reference exists.
Deliberately asymmetric design: the card may have a wide banner on one side and a narrow decorative strip on the other. Opposite design widths are unequal by design. Measuring those widths as if they should be 50/50 would make a correctly cut card look “off-center.” Look for a separate, repeatable printed frame before considering a ratio.
Partial or irregular frame: one side may have a stable border while the other is interrupted by artwork. A local straight segment can sometimes support a limited comparison if matching segments exist at equivalent positions. But mixing a frame on one side with an unrelated artwork edge on the other does not measure centering. Record which axis, if any, is defensible; it is acceptable to reject only the horizontal or vertical ratio.
A defensible guide-placement test
For each axis, identify the outer physical edges first. Then identify two opposing, comparable inner boundaries belonging to the same printed frame. Check whether they are visible over a useful length, repeat at equivalent locations, and survive small changes of zoom or lighting. If the line fades into art, breaks around a character, or curves differently on opposite sides, the reference weakens. The card's shape being rectangular does not make every printed element a symmetric reference.
One defensible example is a borderless-looking card with a continuous, equally designed inner panel on all four sides. You can measure the panel-to-edge distances and label them precisely as visible panel balance. You should still avoid claiming that the panel's layout proves manufacturer-intended cut symmetry unless supported by the design. A non-defensible example is placing the left guide on a text-box edge and the right guide on a figure silhouette simply because those are the nearest contrasting lines.
A second non-defensible example is using a sleeve seam as an outer edge because the true card edge is hidden. The methodology's rejection criteria apply: if a physical edge is cropped, blurred, covered by glare, or inseparable from holder plastic, retake the photo. Entering those widths in the Manual Calculator would not make the references more valid; it uses the values you supply.
Keep camera distortion separate from print design
An angled camera can make opposite edges converge and change apparent spacing. Start with a square photo where possible. If the card is a trapezoid in the image, the tool's four-corner perspective correction maps the selected physical corners to a rectangular workspace. That corrects a camera-view geometry problem; it cannot create a printed frame where none exists. Crop-only mode does not correct perspective. The perspective method and its worked case study show the distinction.
A whole printed design may also be displaced relative to the cut, while individual color layers are misregistered relative to one another. If a colored outline is shifted but the main frame is stable, different visual references may tell different stories. State which boundary you measured. Without production reference art or sheet data, do not assume you can separate every cutting issue from registration in one photo. A tilted or uneven inner line may also be a real print feature rather than camera roll; the tool's advanced uneven-inner-tilt control is for sampling a genuine boundary, not for making arbitrary artwork symmetrical.
When to stop measuring
- Reject an axis if there is no paired, repeatable printed inner reference.
- Reject the photo if card edges are hidden or perspective cannot be corrected confidently.
- Repeat guide placement from a fresh view; note if reasonable placements give materially different values.
- Describe visible design balance qualitatively when a ratio is unsupported.
- Keep any valid measurement separate from claims about grade or printer intent.
The practical outcome may be “horizontal centering not measurable from this design” even when the tool is available. That tells a buyer, seller, or submission reviewer exactly what the image can support. For ordinary framed cards, use the Card Centering tool and the complete measurement guide; for this class of designs, the boundary-selection decision comes first.